Life & Other Stuff

Showing posts with label Favorites From the World. Show all posts

Sunday, March 18, 2012

Quinoa for Breakfast

A friend recently suggested I try eating Quinoa in place of my steel cut oatmeal for a change in my breakfast choices. Quinoa for breakfast? I'm not so sure about this idea.

Quinoa is related to beets, spinach, and tumbleweeds. Like oats it contains a balanced set of essential amino acids for humans, making it a complete protein source. It is a good source of dietary fiber and phosphorus and is high in magnesium and iron. Healthy!

So tonight, I cooked up some Quinoa. I added a touch of maple syrup, fresh pears, and cinnamon for tomorrow's breakfast. I'm hoping it tastes as good as it smelled.

Tuesday, March 6, 2012

Apples and Yogurt Dip

A party snack favorite and OH so easy to put together.

Yogurt dip after 4 women "attacked" it. Haha!
Ingredients:
1 - 8 oz. Yoplait Honey Vanilla Greek Yogurt
1/4 cup sliced almonds
1/4 cup Vanilla granola
2 Fuji apples sliced
Small bowl of filtered water
2 Tbsp. salt

Directions for yogurt dip:
1. Pour yogurt into a presentable shallow bowl. You can use any flavor yogurt you want. I chose Greek because it has a thicker consistency so the yogurt will "stick" to the apples better. I chose Honey Vanilla because the flavors go well with the apples. But, really, you can use any of your favorite flavors. Keep refrigerated until ready to serve.
2. Just before serving layer over the yogurt the almonds.
3. Then layer the granola over the almonds.
4. I gently shook the bowl. The yogurt stayed in place but the almonds and granola mixed slightly to blend the flavors.

Apple Preparation:
One of my favorite kitchen tools is the apple divider. Makes apple cutting SUPER EASY! I'm all about easy.

With parties, prepping your food is key so you don't feel crunched for time when the guests arrive. You can prepare the apples in advance. But apples brown, you say. You can treat the sliced apples with a bit of fresh lemon but to me that's a waste of the lemon. Recently I learned another tip. Soak apple slices in salted water.

1. In a medium size bowl (large enough to fit all your apple slices) pour enough water to fill 1/2 the bowl  (once you immerse the apples the water will rise).
2. Pour salt in and mix with a spoon (I like to use chopsticks. It's not just for eating!) to help the salt dissolve.
3. Slice/divide the apples and place in the salty water.
4. Keep cool in refrigerator until ready to serve.
5. Just before serving, rinse the apples just to get rid of the salt. Salt will also enhance the sweetness of the fruit.

Carefully present the apples on a nice platter. You can place the dip in the center for easy dipping.
Voila! Your guests will be wondering how you put it all together. It's quite yummy!

Sunday, January 8, 2012

"Good For You" Banana Bread

Old bananas, new recipe makes for a "good for you" baking adventure.


When I usually bake it involves butter, sugar, and sometimes chocolate. But I had these browning bananas and the only thing I could think of was to make banana bread. I didn't want to throw them out but I knew they were too ripe to eat. I came across this recipe on the Whole Foods website. I was intrigued by the flax meal and yogurt ingredients. This made me think maybe I could make it even healthier.

In the original recipe (see link below) it asks for butter but I actually didn't have any and had already started mixing so I didn't want to stop and run to the store. Instead I remember that sometimes applesauce can be used as a substitute. Ding ding ding... brilliant! Did a bit of research and yes, it can be a substitute, but only sometimes. I wasn't sure if this might be one of those situations but I figured I'd give it a try. AND a friend indicated that she replaced chocolate chips with blueberries and didn't miss the chocolate at all. Hmmm... that could be interesting. Must try! Thus the adventure began.

I used the same recipe as Whole foods except that I substituted the butter for applesauce. I defrosted some mixed berries I had on hand (though next time I think I'll use fresh blueberries). I cut down on the sugar a little. I couldn't find my walnuts so I used almonds. Almonds were fine but I think the walnuts would have added a nice flavor and texture to the bread. Other additions might be nice, too like raisins or currants. Maybe even cranberries. All these additions made me think of smoothies. When making a smoothie, what goes well with bananas? Maybe those same ingredients would be good in this bread. YUM!

Next time, though, I think I might try using more wheat flour than all-purpose flour. Give even more of a health kick.

My friend happened to come over just after it finished baking so she got to taste test. Seems like it might be a success.  I quite like it myself.

So, here is my recipe. If you use the recipe, please leave me a comment. How did you make it your own? Or if you didn't, would you bake this again? Can't wait to hear...


Ingredients

Cooking spray 
1 1/2 cups unbleached all-purpose flour 
1/2 cup whole wheat flour 
1 teaspoon baking soda 
2 tablespoons ground flax meal 
1 tablespoon ground cinnamon 
1/2 teaspoon salt 
1/2 cup unsweetened applesauce
1/3 cup granulated sugar 
2 eggs 
1/3 cup fat free or low fat plain Greek yogurt 
3 very ripe bananas, smashed (about 1 1/2 cups) 
2 teaspoons vanilla extract 
1/2 cup blueberries or berries of your choice
1/4 cup of walnuts (or nuts of your choice)

Method

Preheat oven to 350°F. Spray an 8-inch x 4-inch metal loaf pan with cooking spray; set aside. Whisk together both flours, baking soda, flax meal, 2 teaspoons of the ground cinnamon and salt; set aside. Cream together butter with sugar using a mixer. Add eggs, one at a time, beating well after each addition. Mix in yogurt, bananas and vanilla. Fold in flour mixture and mix until just incorporated. Spoon batter into loaf pan. Stir together turbinado sugar and remaining 1 teaspoon cinnamon. Sprinkle over the top of the banana bread. Bake 55 to 60 minutes or until a knife inserted in the center of the loaf comes out clean. Allow to cool slightly, then remove from baking pan. Chef's Tip: If using a glass baking pan, decrease cooking time by 5 to 10 minutes. 

Nutrition (Whole Foods Recipe)

Per serving: 170 calories (40 from fat), 4.5g total fat, 2.5g saturated fat, 40mg cholesterol, 190mg sodium, 29g total carbohydrate (2g dietary fiber, 13g sugar), 4g protein 


This recipe was inspired by the Whole Foods "Light-n-Luscious Banana Bread" recipe.

Monday, January 2, 2012

Poached Eggs in Tomato Sauce with Chickpeas and Feta

My brother made an interesting, delicious dish for Christmas this year. I enjoyed it so much I had to make it for one of my parties. I've never had a dish like this before but the flavors were perfect. Yum! 

He got this recipe from Bon Appetit Test Kitchen.

Popular in Israel, this shakshuka works for breakfast, lunch, or dinner.
4–6 servings
  • active: 30 minutes
  • total: 35 minutes
Recipe by The Bon Appétit Test Kitchen
Photograph by Lisa Hubbard
December 2011

Ingredients

  • ¼ cup olive oil
  • 1 medium onion, finely chopped
  • 4 garlic cloves, coarsely chopped
  • 2 jalapeños, seeded, finely chopped
  • 1 15-ounce can chickpeas, drained
  • 2 teaspoons Hungarian sweet paprika
  • 1 teaspoon ground cumin
  • 1 28-ounce can whole peeled tomatoes, crushed by hand, juices reserved
  • Kosher salt and freshly ground black pepper
  • 1 cup coarsely crumbled feta
  • 8 large eggs
  • 1 tablespoon chopped flat-leaf parsley
  • 1 tablespoon chopped fresh cilantro
  • Warm pita bread

Preparation

  • Preheat oven to 425°. Heat oil in a large ovenproof skillet over medium-high heat. Add onion, garlic, and jalapeños; cook, stirring occasionally, until onion is soft, about 8 minutes. Add chickpeas, paprika, and cumin and cook for 2 minutes longer.
  • Add crushed tomatoes and their juices. Bring to a boil, reduce heat to medium-low, and simmer, stirring occasionally, until sauce thickens slightly, about 15 minutes. Season to taste with salt and pepper. Sprinkle feta evenly over sauce. Crack eggs one at a time and place over sauce, spacing evenly apart. Transfer skillet to oven and bake until whites are just set but yolks are still runny, 5–8 minutes. Garnish with parsley and cilantro. Serve with pita for dipping.
Poached Eggs in Tomato Sauce with Chickpeas and Feta

Nutritional information
Four servings, one serving contains:
Calories (kcal) 357.8
%Calories from Fat 56.4
Fat (g) 22.4
Saturated Fat (g) 7.2
Cholesterol (mg) 270.9
Carbohydrates (g) 21.6
Dietary Fiber (g) 4.5
Total Sugars (g) 7.3
Net Carbs (g) 17.1
Protein (g) 16.9
Sodium (mg) 661.0

Sunday, November 13, 2011

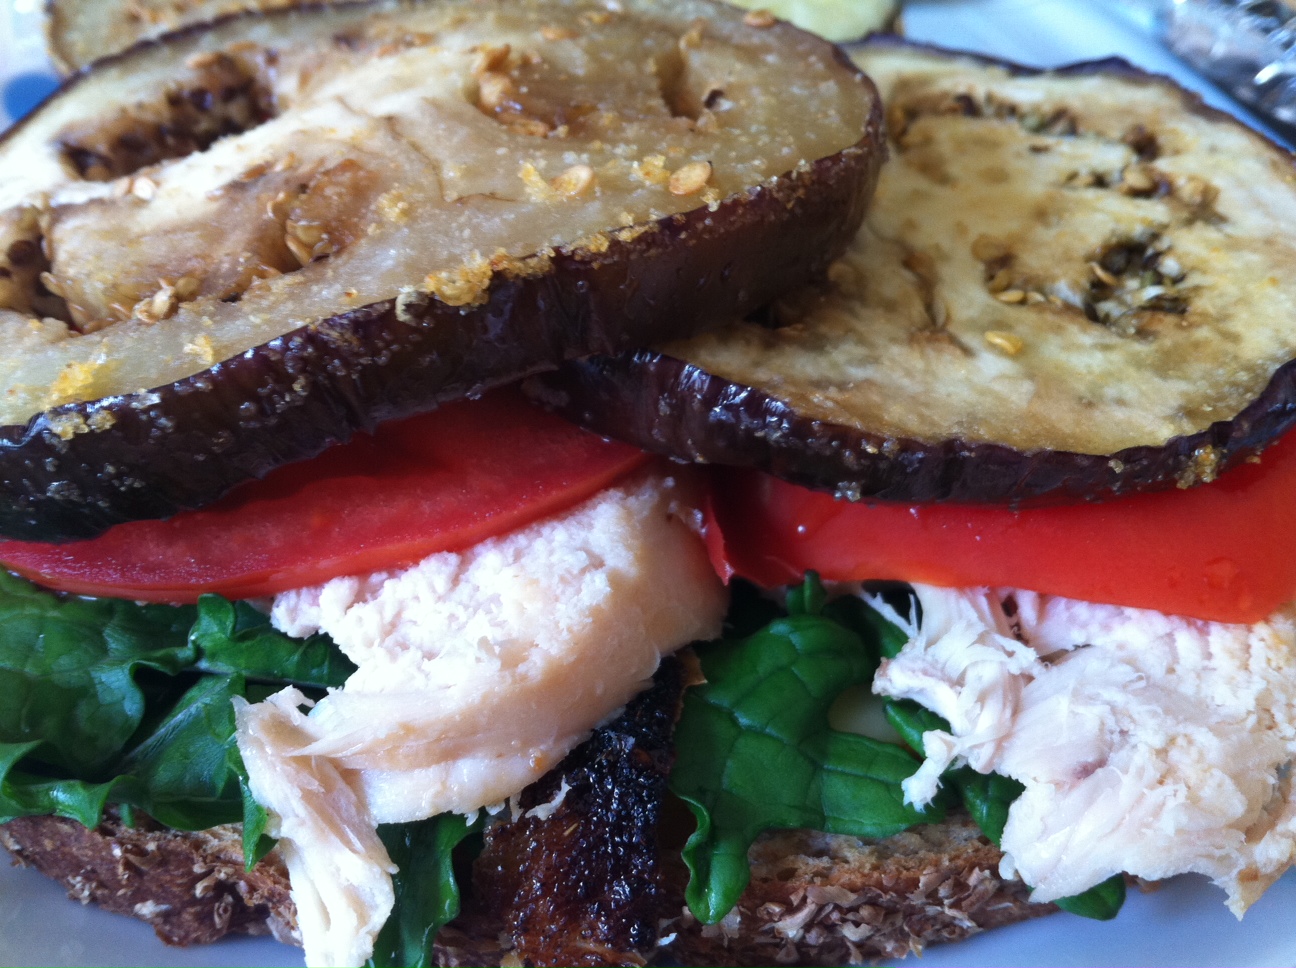
Open Face Eggplant Sandwich

It's Sunday.   Time to clean out the fridge and restock for the new week.  Opened the door and found that I could make this recipe immediately.  Yippee!


Ingredients:
1 lb tomatoes, finely chopped (2 1/2 cups)
1/4 cup finely chopped fresh flat-leaf parsley
1/2 cup plus 2 tablespoons extra-virgin olive oil
1 tablespoon white-wine vinegar
1/2 teaspoon black pepper
3/4 teaspoons salt
1 (8-oz) piece smoked cheese such as Gouda, mozzarella, or scamorza
4 (3/4-inch-thick) slices country-style bread (from an 8-inch round loaf)
2 (1-lb) eggplants

Preparation
Prepare grill for cooking over direct heat with medium-hot charcoal (moderate heat for gas); see Grilling Procedure.
While grill is heating, stir together tomatoes, parsley, 2 tablespoons oil, vinegar, pepper, and 3/4 teaspoon salt in a medium bowl.

With a cheese plane or vegetable peeler, shave half of cheese into thin slices (if using mozzarella, thinly slice half of it with a knife) and cover slices with plastic wrap, reserving remaining piece for another use.

Brush bread on both sides with 1 tablespoon oil per slice.

Trim off top and bottom of each eggplant, then cut 2 (1-inch-thick) slices lengthwise from center of each eggplant, discarding remainder. Brush cut sides with 3 tablespoons oil (total) and sprinkle with remaining 1/2 teaspoon salt.

Lightly oil grill rack, then grill eggplant slices (covered only if using a gas grill), loosening with a metal spatula and turning occasionally to avoid overbrowning, until very tender, 8 to 10 minutes. While eggplant is grilling, grill bread, turning over once, until grill marks form, 1 to 2 minutes total, and transfer to a large platter.


Transfer eggplant to platter, then top evenly with sliced cheese and return to grill and cook, covered for charcoal or gas, without turning, until cheese begins to melt, about 1 minute. Transfer eggplant with spatula to platter.

Transfer grilled bread to 4 plates and spoon tomato mixture on top. Drizzle evenly with remaining tablespoon oil and top with eggplant. Season with pepper to taste.

Cooks' notes: · If you can't grill outdoors, bread and eggplant can be cooked in 2 batches on a lightly oiled well-seasoned large (2-burner) ridged grill pan over moderate heat. Grill eggplant, turning occasionally, 10 to 13 minutes, then top with cheese. Transfer eggplant to a large baking sheet and broil about 3 inches from preheated broiler until cheese is just melted, about 1 minute. · Tomato mixture can be made 30 minutes ahead and kept at room temperature.

Tips:
  • happened to have kale in the fridge.  It was a nice combination of bitterness to the sweetness of the eggplant and creaminess of the gouda.
  • spinach, arugula would also be nice additions to this.
  • added thin slices of chicken and tomato to this sandwich.  Would work well with other ingredients that compliment eggplant as well.
  • toasted my bread in the toaster rather than grilling.
  • roasted my eggplant in the oven. I prefer grilling but for ease, I roasted it in the oven.

Read More on Epicurious

Pumpkin Stuffed with Everything Good

A delightful Fall holiday treat.  Found this recipe on Epicurious.com.  Had fun putting this recipe together and stuffing my little pumpkin with good stuff.

Ingredients:
1 pumpkin, about 3 pounds
Salt and freshly ground pepper
1/4 pound stale bread, thinly sliced and cut into 1/2-inch chunks
1/4 pound cheese, such as Gruyère, Emmenthal, cheddar, or a combination, cut into 1/2-inch chunks
2–4 garlic cloves (to taste), split, germ removed, and coarsely chopped
4 slices bacon, cooked until crisp, drained, and chopped (my addition)
About 1/4 cup snipped fresh chives or sliced scallions (my addition)
1 tablespoon minced fresh thyme (my addition)
About 1/3 cup heavy cream
Pinch of freshly grated nutmeg

Preparation:
Center a rack in the oven and preheat the oven to 350 degrees F. Line a baking sheet with a silicone baking mat or parchment, or find a Dutch oven with a diameter that's just a tiny bit larger than your pumpkin. If you bake the pumpkin in a casserole, it will keep its shape, but it might stick to the casserole, so you'll have to serve it from the pot—which is an appealingly homey way to serve it. If you bake it on a baking sheet, you can present it freestanding, but maneuvering a heavy stuffed pumpkin with a softened shell isn't so easy. However, since I love the way the unencumbered pumpkin looks in the center of the table, I've always taken my chances with the baked-on-a-sheet method, and so far, I've been lucky.

Using a very sturdy knife—and caution—cut a cap out of the top of the pumpkin (think Halloween Jack-o-Lantern). It's easiest to work your knife around the top of the pumpkin at a 45-degree angle. You want to cut off enough of the top to make it easy for you to work inside the pumpkin. Clear away the seeds and strings from the cap and from inside the pumpkin. Season the inside of the pumpkin generously with salt and pepper, and put it on the baking sheet or in the pot.
Toss the bread, cheese, garlic, bacon, and herbs together in a bowl. Season with pepper—you probably have enough salt from the bacon and cheese, but taste to be sure—and pack the mix into the pumpkin. The pumpkin should be well filled—you might have a little too much filling, or you might need to add to it. Stir the cream with the nutmeg and some salt and pepper and pour it into the pumpkin. Again, you might have too much or too little—you don’t want the ingredients to swim in cream, but you do want them nicely moistened. (It's hard to go wrong here.)

Put the cap in place and bake the pumpkin for about 2 hours—check after 90 minutes—or until everything inside the pumpkin is bubbling and the flesh of the pumpkin is tender enough to be pierced easily with the tip of a knife. Because the pumpkin will have exuded liquid, I like to remove the cap during the last 20 minutes or so, so that the liquid can bake away and the top of the stuffing can brown a little.


When the pumpkin is ready, carefully, very carefully—it's heavy, hot, and wobbly—bring it to the table or transfer it to a platter that you'll bring to the table.

Serving
You have a choice—you can either spoon out portions of the filling, making sure to get a generous amount of pumpkin into the spoonful, or you can dig into the pumpkin with a big spoon, pull the pumpkin meat into the filling, and then mix everything up. I'm a fan of the pull-and-mix option. Served in hearty portions followed by a salad, the pumpkin is a perfect cold-weather main course; served in generous spoonfuls, it's just right alongside the Thanksgiving turkey.

Storing
It's really best to eat this as soon as it's ready. However, if you’ve got leftovers, you can scoop them out of the pumpkin, mix them up, cover, and chill them; reheat them the next day.

Bonne Idée
There are many ways to vary this arts-and-crafts project. Instead of bread, I've filled the pumpkin with cooked rice—when it's baked, it's almost risotto-like. And, with either bread or rice, on different occasions I've added cooked spinach, kale, chard, or peas (the peas came straight from the freezer). I’ve made it without bacon (a wonderful vegetarian dish), and I’ve also made it and loved, loved, loved it with cooked sausage meat; cubes of ham are also a good idea. Nuts are a great addition, as are chunks of apple or pear or pieces of chestnut.


Read More at Epicurious

Saturday, July 2, 2011

Food Trucks

Vrooom... vroooom... 

I've become a fan of the food truck.  They're a huge fad right now, bringing a new name to "fast food".  It fascinates me because it's usually a blend of ethnic foods, often fused together.  Consider Korean tacos, Indian burritos, gourmet ice cream, a truck just for different kinds of empanadas, etc.  Crowds of people usually gather for picnics around these food truck events bring communitie together.

I heart food trucks!


So far, I've only been to two events that had food trucks.  The first was a Father's Day helicopter/food truck/beer fest event.  The second was actually a food truck event in San Mateo where they had about 25 food trucks lined up.  YUM!

Wednesday, March 23, 2011

Tom Kha Gai (Thai Spicy and Sour soup)

I had so much fun making this soup.  Southeast Asian foods are like "sparklers" in your mouth, especially if there is lime or coconut milk in it.  YUM!  I've been so curious what it would be like to cook with lemongrass.  Reaching of my culinary comfy zone I took the risk and made this.  I've had it in a restaurant before but I liked the fact that I could cut down on the calories by using "Lite"r ingredients.

Turned out to be delicious in my book! 

Tip:  I used my slow cooker for this.  You can make this soup vegetarian, chicken, or seafood and it would be yummy, I think.  Only thing I need to figure out a bit better is how to prevent the coconut milk from separating in the crock pot.  I wonder if it's because it cooked for awhile.  Might be better in a normal stock pot.


I took photos but they got deleted.  Next time!
Recipe:

Inspired by Tom Kha Gai @ Wikibooks Cookbook

Ingredients


Serves five.

2½ (600ml) cups coconut milk (Lite)

3¼ (775ml) cups chicken stock (low sodium, low fat).

4 stalks lemongrass, cut into 1" (2.5cm) bits or split lengthwise

4 small pieces of ginger.  I cut them sizeable because I personally don't like to chew ginger.  This way I can take them out of the soup and they are only in the pot for flavor.

3-4 mini chilies, finely chopped.

400g chicken, cubed.

1 medium onion, quartered

2 tomato, quartered and peeled

1 cup (150g) mushrooms, sliced

1½ teaspoon sugar

¼ teaspoon pepper

3 tablespoons lime juice

2 tablespoons soy sauce

4 tablespoons cilantro

Procedure


1.Bring stock and coconut milk to a boil.

2.Add lemongrass, galangal, chilies, sugar and pepper.

3.Add onion, tomato, chicken bits, and mushrooms.

4.Keep at a rolling boil for 4 minutes.

5.Remove the pot from the heat.

6.Stir in lime juice and soy sauce.

7.Garnish with cilantro and chilies

Sunday, January 9, 2011

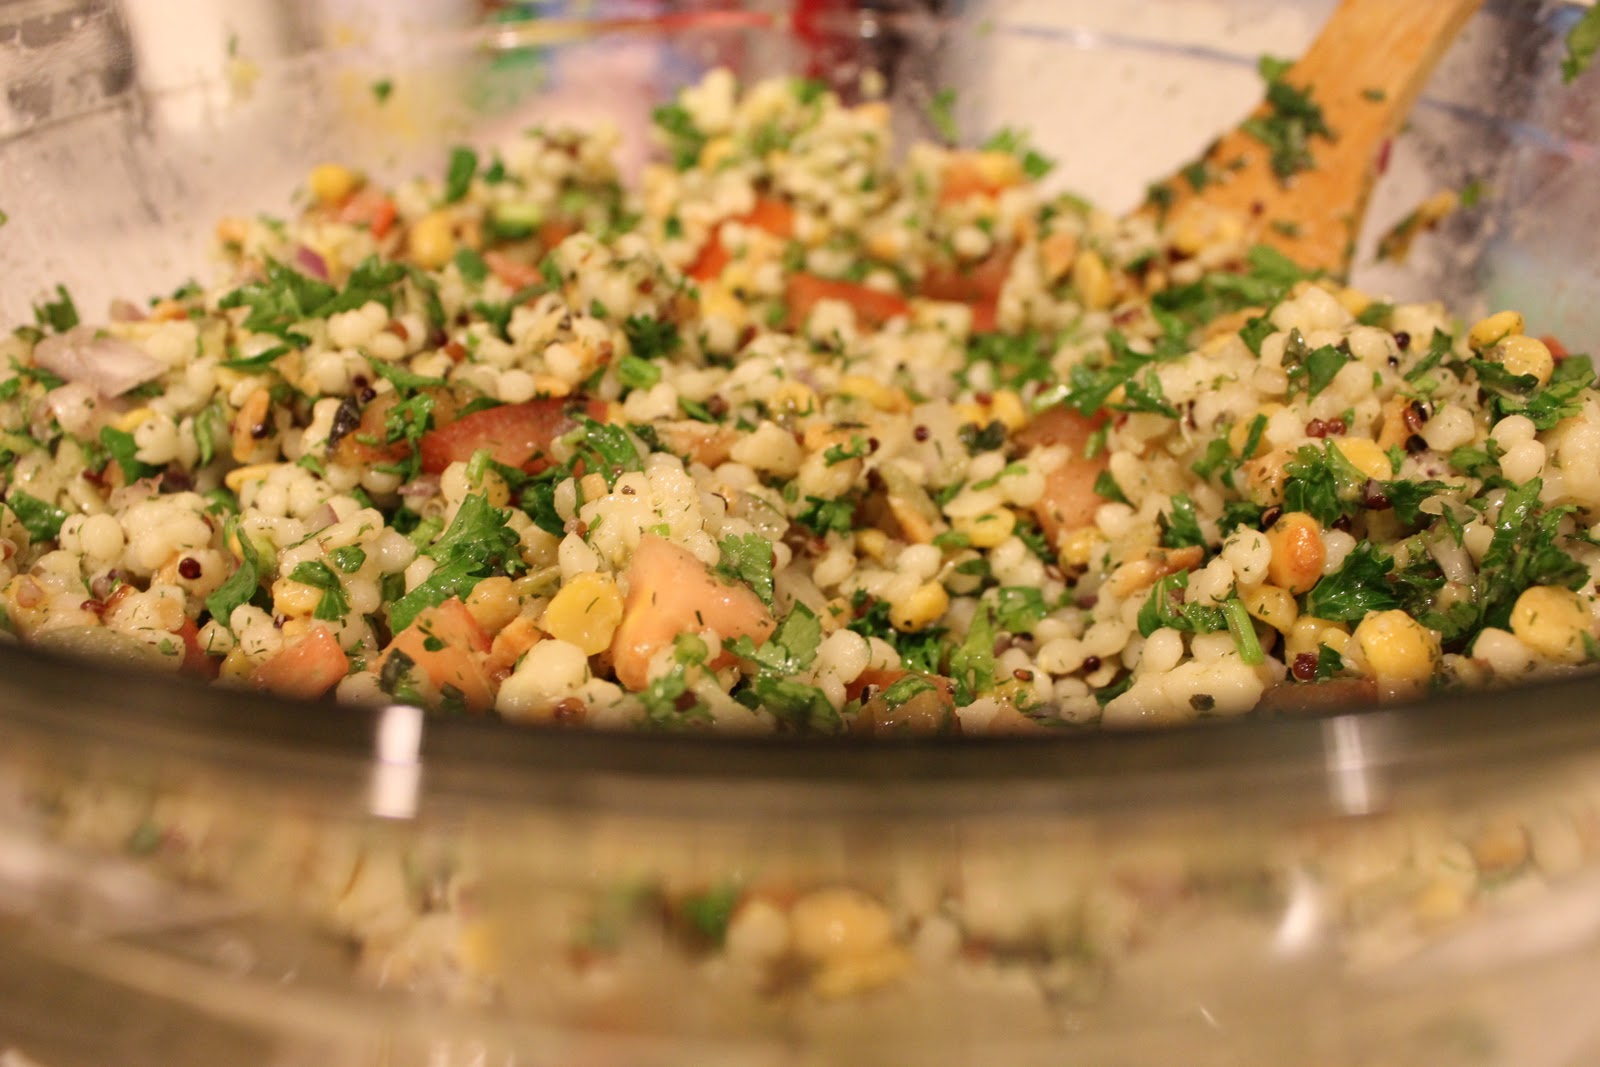
Tabbouleh

I love to cook!  Rarely am I a "follow the recipe" kind of cook.  My process usually begins because I have an ingredient that I want to use up or try, then I get on the computer and start searching for something that sounds tasty.  Unfortunately, sometimes these experiments flop on me and I'm left eating a dish I don't like but can't let it go to waste.  Then there are the other times when I'm thoroughly surprised. 

This particular recipe was inspired by a tabbouleh my sister-in-law picked up from a little "healthy/organic" cafe in San Francisco.  We were on a road trip and she had me taste some of her leftovers.  In her Tabbouleh she had bits of dried marinated tofu and quinoa (traditionally made of bulgur).  I had never thought of using untraditional ingredients in this traditional dish.  I couldn't wait to make it.

So, at home I had a bag of TJ's Harvest Mix.  I think you could use a variety of small grains if you wanted to.  What makes Tabbouleh delicious is all of the fresh herbs, vegetables, and flavors when the meld together.  So healthy, light, and delicious.  A great compliment to any chicken or lamb dish or even as a topper for your salad.

Delicious!


Inspired by Lemon and Fresh Herb Tabbouleh @ Epicurious.com


Ingredients:
1 pkg of Trader Joe's Harvest Mix (Couscous, quinoa, and other grains)

2 tablespoons extra virgin olive oil

2 garlic cloves, minced

2 cups finely chopped fresh flat-leaf parsley (about 3 bunches)

3/4 cup diced red onion

2 medium tomatoes, seeded and diced

1/3 cup finely chopped fresh mint

1/4 cup finely chopped fresh basil

3 tablespoons finely chopped fresh dill

3 tablespoons finely chopped fresh cilantro

1/3 cup fresh lemon juice

print a shopping list for this recipe


Preparation
1. I cooked the harvest mix in my rice cooker (using the same method I cook asian rice where you put your finger in the pot and add only enough water from the top of the rice (after its settled) to the first digit of your pointer finger.  This is my mother's method for cooking the perfect pot of rice.

Note:  I wanted to make it with quinoa rather than the traditional bulgar (see above link to original recipe) but the only grains I had that had quinoa in it was the harvest mix.  So, this was a bit of an experiment.
2. Transfer the mix to a large bowl and toss with the remaining 1 tablespoon oil and the rest of the ingredients until everything is well mixed. Cover and refrigerate for at least 3 hours. Serve cold.

Saturday, November 6, 2010

Spanish Hot Cocoa at Chocolateria San Gines

As the fall weather turns chilly I'm reminded of my encounter with Spanish Hot Cocoa.  A few years ago, my BFF and I galavanted to Madrid, Spain for some rest and relaxation.  Ok, our method of travel isn't exactly easygoing but the intent is to get out the door and see the world.  She's the history buff, I'm the planner. A fabulous combination if I may say so myself.  The alarm clock goes off in the morning (sometimes as early as 4 or 5 am), the comfy shoes are slapped on, cameras strapped, and a trail mix in the purse for extra energy then off we go until we can hardly stand at the end of the day.    

On this particular adventure in Madrid, we found our way to a unique little cafe in Madrid called Chocolateria San Gines.  To borrow from Wikipedia, Chocolateria San Gines is a cafe that serves chocolate and churros(as well as other things).  Can you imagine this combination?  Think beyond your typical cup of cocoa to something much more rich.  This chocolate is so thick you can just lay your spoon on it without it sinking in.  WOH!
 This is not for the faint hearted if all you're looking for is liquid pleasure.  This is a sincerely delectible dessert.You're supposed to just sit and chat as you indulge.  But, being Americans sitting leisurely like the Europeans, I learned, takes a bit of patience and practice.  After a few dips into this cup, I was ready to figure out where we were off to next.  A lesson for me... relax, take it easy, enjoy.  I'm still learning.

But, if anything is going to make me "take it easy" its this.

Sibby's Cupcakes

I'm attracted to pretty cupcakes.  It's a weakness of mine.  How can you say "no" to something so pretty?  Through the last few years, I've been intrigued to try cupcakes from different gourmet stores.  I'd heard a lot about this particular bakery as they seem to use a lot of organic ingredients.  Does that  mean its a healthy baked good?  My first guess is NO, but boy were these some of the yummiest I've ever tried. 


The cake was incredibly moist.  I think I've had my share of cupcakes that were just a little too dry within or the frosting was too mushy or whip creamish (which I'm not a fan of). 
Their cupcakes were the perfect combination in terms of flavor, texture, and no after taste.

I wish they have a store front. Seems like they only do pre-order.  At the end of the day, though, if you stop by their kitchen, they sell individual leftover cupcakes from the day.  YUM!


One quirky thing about this cupcakery... it's a little tricky to find.  They're sandwiched between auto shops.  Huh? 
Who woulda thunk!