Life & Other Stuff

Thursday, March 8, 2012

Emboss It!

Embossing is one of the simplest ways to make a simple card look fancy.

I used the Cuttlebug to emboss these. The Cuttlebug is portable and easy to use. Last fall I got myself a Big Shot. I'm in love!

I had paper flowers. I glued them down first and then embossed.
The flowers look like they're part of the paper. Pretty effect!
Another example of flowers embossed into the paper. Easy but lovely effect.

These cards were made for a work event to thank senior leaders for volunteering.
I was honored to hand craft these for them.


Wednesday, March 7, 2012

Peekaboo... Happy Birthday!

My little nephew is a HUGE fan of all the Sesame Street characters. Elmo was one of his favorites. For his birthday last August, this was the card I gave him.


I used a scallop punch for Elmo, circle punch for his eyes, cut out his nose, and used remnants of an eighth note sticker for the eyes. For the mouth I trimmed a punched 1/2 circle and of course for the polka dots I used my circle punch. The "2" was cut out from my Slice machine.

It took me a long time to make the card but it was worth it.

Happy Birthday Little Z!

Tuesday, March 6, 2012

Apples and Yogurt Dip

A party snack favorite and OH so easy to put together.

Yogurt dip after 4 women "attacked" it. Haha!
Ingredients:
1 - 8 oz. Yoplait Honey Vanilla Greek Yogurt
1/4 cup sliced almonds
1/4 cup Vanilla granola
2 Fuji apples sliced
Small bowl of filtered water
2 Tbsp. salt

Directions for yogurt dip:
1. Pour yogurt into a presentable shallow bowl. You can use any flavor yogurt you want. I chose Greek because it has a thicker consistency so the yogurt will "stick" to the apples better. I chose Honey Vanilla because the flavors go well with the apples. But, really, you can use any of your favorite flavors. Keep refrigerated until ready to serve.
2. Just before serving layer over the yogurt the almonds.
3. Then layer the granola over the almonds.
4. I gently shook the bowl. The yogurt stayed in place but the almonds and granola mixed slightly to blend the flavors.

Apple Preparation:
One of my favorite kitchen tools is the apple divider. Makes apple cutting SUPER EASY! I'm all about easy.

With parties, prepping your food is key so you don't feel crunched for time when the guests arrive. You can prepare the apples in advance. But apples brown, you say. You can treat the sliced apples with a bit of fresh lemon but to me that's a waste of the lemon. Recently I learned another tip. Soak apple slices in salted water.

1. In a medium size bowl (large enough to fit all your apple slices) pour enough water to fill 1/2 the bowl  (once you immerse the apples the water will rise).
2. Pour salt in and mix with a spoon (I like to use chopsticks. It's not just for eating!) to help the salt dissolve.
3. Slice/divide the apples and place in the salty water.
4. Keep cool in refrigerator until ready to serve.
5. Just before serving, rinse the apples just to get rid of the salt. Salt will also enhance the sweetness of the fruit.

Carefully present the apples on a nice platter. You can place the dip in the center for easy dipping.
Voila! Your guests will be wondering how you put it all together. It's quite yummy!

Friday, March 2, 2012

100 Followers, 100 Following

Woohoo! A Pinterest milestone.

Today I hit an equal number of followers and those I follow. What are the chances it happens at the same moment!

Yippeeee! Come follow me on Pinterest.

Thursday, March 1, 2012

Stampin' Up Kick Off

February 4, 2012 was the kick off for my new business as a Stampin' Up Independent Demonstrator.

Off to a great start, eight friends came out and joined me for a fun evening of desserts and paper crafts. 
Table all setup with catalogs, adhesive, and wish lists. 
Ready, set, CRAFT!


Each guest received a Tea Holder favor which contained a bag of tea and a cookie.


This treat favor was inspired by Niki's Tea Holder.

Project 1: Sour Cream Container
My upline Charlette taught me how to do this.
It's such a simple project to put together but the effect goes a long way.
Hide some candy inside and VOILA!, it's a party favor.
 Project 2: Valentine's Day Card


 Project 3: Happy Birthday


What's a party without a raffle and prizes for upcoming hostesses?

Overall, I think the workshop was a big success! It was a lot of work and time to put one together but seeing how much fun everyone had doing the crafts was reward enough. After all, Stampin' Up is more than just the paper and stamps. It's the people and sharing what you love to do with them!

Time to plan for the next one!


Sunday, January 8, 2012

"Good For You" Banana Bread

Old bananas, new recipe makes for a "good for you" baking adventure.


When I usually bake it involves butter, sugar, and sometimes chocolate. But I had these browning bananas and the only thing I could think of was to make banana bread. I didn't want to throw them out but I knew they were too ripe to eat. I came across this recipe on the Whole Foods website. I was intrigued by the flax meal and yogurt ingredients. This made me think maybe I could make it even healthier.

In the original recipe (see link below) it asks for butter but I actually didn't have any and had already started mixing so I didn't want to stop and run to the store. Instead I remember that sometimes applesauce can be used as a substitute. Ding ding ding... brilliant! Did a bit of research and yes, it can be a substitute, but only sometimes. I wasn't sure if this might be one of those situations but I figured I'd give it a try. AND a friend indicated that she replaced chocolate chips with blueberries and didn't miss the chocolate at all. Hmmm... that could be interesting. Must try! Thus the adventure began.

I used the same recipe as Whole foods except that I substituted the butter for applesauce. I defrosted some mixed berries I had on hand (though next time I think I'll use fresh blueberries). I cut down on the sugar a little. I couldn't find my walnuts so I used almonds. Almonds were fine but I think the walnuts would have added a nice flavor and texture to the bread. Other additions might be nice, too like raisins or currants. Maybe even cranberries. All these additions made me think of smoothies. When making a smoothie, what goes well with bananas? Maybe those same ingredients would be good in this bread. YUM!

Next time, though, I think I might try using more wheat flour than all-purpose flour. Give even more of a health kick.

My friend happened to come over just after it finished baking so she got to taste test. Seems like it might be a success.  I quite like it myself.

So, here is my recipe. If you use the recipe, please leave me a comment. How did you make it your own? Or if you didn't, would you bake this again? Can't wait to hear...


Ingredients

Cooking spray 
1 1/2 cups unbleached all-purpose flour 
1/2 cup whole wheat flour 
1 teaspoon baking soda 
2 tablespoons ground flax meal 
1 tablespoon ground cinnamon 
1/2 teaspoon salt 
1/2 cup unsweetened applesauce
1/3 cup granulated sugar 
2 eggs 
1/3 cup fat free or low fat plain Greek yogurt 
3 very ripe bananas, smashed (about 1 1/2 cups) 
2 teaspoons vanilla extract 
1/2 cup blueberries or berries of your choice
1/4 cup of walnuts (or nuts of your choice)

Method

Preheat oven to 350°F. Spray an 8-inch x 4-inch metal loaf pan with cooking spray; set aside. Whisk together both flours, baking soda, flax meal, 2 teaspoons of the ground cinnamon and salt; set aside. Cream together butter with sugar using a mixer. Add eggs, one at a time, beating well after each addition. Mix in yogurt, bananas and vanilla. Fold in flour mixture and mix until just incorporated. Spoon batter into loaf pan. Stir together turbinado sugar and remaining 1 teaspoon cinnamon. Sprinkle over the top of the banana bread. Bake 55 to 60 minutes or until a knife inserted in the center of the loaf comes out clean. Allow to cool slightly, then remove from baking pan. Chef's Tip: If using a glass baking pan, decrease cooking time by 5 to 10 minutes. 

Nutrition (Whole Foods Recipe)

Per serving: 170 calories (40 from fat), 4.5g total fat, 2.5g saturated fat, 40mg cholesterol, 190mg sodium, 29g total carbohydrate (2g dietary fiber, 13g sugar), 4g protein 


This recipe was inspired by the Whole Foods "Light-n-Luscious Banana Bread" recipe.

Monday, January 2, 2012

Happy New Year 2012

2011 turned out to be a satisfying year for me.

Not gonna lie, life is sometimes REALLY hard to live. I have problems, weaknesses, issues, etc. just like everyone else. My list of faults is long, so far from "perfect". But between the nooks and crannies of "life" I am living. I am happier and living more fully.

Relationships.
I've been working hard on myself to be more authentic, assertive, and centered. There have been some relationships that I've simply had to let go of because they were either no longer beneficial to living a healthy life. And others I've had to open communication with them to adjust them. It's been really hard to do but taking those risks has made me a happier person.

Spirituality.
My faith gets stronger. I've been blessed with a loving church community. I've been surrounded by a group of women that are forgiving and caring. Being a part of their lives and having them in mine has been healing. God has placed me in uncomfortable situations while serving those in my community who are in need but I have been humbled through them and my heart is even bigger than it was a year ago. He is good!

Crafting.
My year has been full of creativity at so many levels. I've continued to surround myself with creative people who inspire me. This creative community is also social, bringing into my life new friendships that have filled my days with laughter and great conversation.

365 Project.
Perhaps this has been my most life changing endeavor of the year. I write much about it in my 365 project blog (http://365project.org/julz) but overall I have proven to myself that I have great discipline to see myself through a project from beginning to end. I have learned to accept that sometimes perfection just can't happen. The task must be done (good or bad). I have been creatively, technically, and humanly challenged through this project. This project has humbled me but filled me with so much gratitude for what God has blessed me with in my life. In many fold, this project has changed me. I am for the better.

2011 ended in peace. The days leading up to the new year I witnessed beauty of the human soul (my niece), the brokenness of a friend losing a loved one, the joy in my little nephews laugh, the forgiveness over broken relationships, the relief in an old lady's face as she was comforted by the sweetness of my dog, the delight that comes from companionship between girl friends. My heart is grateful for all that is in my life right now. It's not perfect. And in many ways it's not even great. But, there is peace and there is grace.

For that, I thank God.

2012 is bound to be another adventure. I turn 40 this coming year. I am excited but also woeful. What does this mean to turn 40? It's a number, indeed. But, it's a milestone; an opportunity for reflection and change. There is anticipation and joy.

Cheers to 2012. May the year be filled with good news, resolution, change, and good health. Cheers!

The Card Swap

My BFF lives on the other side of the country. We're both avid crafters and participate in Stampin' Up workshops from time to time. Recently we found out that we both purchased the same paper punch; the pennant punch.  We decided it would be so much fun to create a card for one another using the same punch.  Then we thought it would be even more fun to keep it going.  Each round would have a different theme.

For each round one person picks a tool, craft item, theme, or technique and both of us must create a card for the other using it. Then with a personal message handwritten inside it gets dropped in the mail to surprise the other. Our first round's item was Stampin Up's Pennant Punch.

I made her a colorful strip of pennants.

She made me a turkey. I was tickled to find her in my mailbox.

Next round's item is Chip Board. Yikes! I've never really used chip board before so I guess I'll be learning something new.

What fun!

Poached Eggs in Tomato Sauce with Chickpeas and Feta

My brother made an interesting, delicious dish for Christmas this year. I enjoyed it so much I had to make it for one of my parties. I've never had a dish like this before but the flavors were perfect. Yum! 

He got this recipe from Bon Appetit Test Kitchen.

Popular in Israel, this shakshuka works for breakfast, lunch, or dinner.
4–6 servings
  • active: 30 minutes
  • total: 35 minutes
Recipe by The Bon Appétit Test Kitchen
Photograph by Lisa Hubbard
December 2011

Ingredients

  • ¼ cup olive oil
  • 1 medium onion, finely chopped
  • 4 garlic cloves, coarsely chopped
  • 2 jalapeños, seeded, finely chopped
  • 1 15-ounce can chickpeas, drained
  • 2 teaspoons Hungarian sweet paprika
  • 1 teaspoon ground cumin
  • 1 28-ounce can whole peeled tomatoes, crushed by hand, juices reserved
  • Kosher salt and freshly ground black pepper
  • 1 cup coarsely crumbled feta
  • 8 large eggs
  • 1 tablespoon chopped flat-leaf parsley
  • 1 tablespoon chopped fresh cilantro
  • Warm pita bread

Preparation

  • Preheat oven to 425°. Heat oil in a large ovenproof skillet over medium-high heat. Add onion, garlic, and jalapeños; cook, stirring occasionally, until onion is soft, about 8 minutes. Add chickpeas, paprika, and cumin and cook for 2 minutes longer.
  • Add crushed tomatoes and their juices. Bring to a boil, reduce heat to medium-low, and simmer, stirring occasionally, until sauce thickens slightly, about 15 minutes. Season to taste with salt and pepper. Sprinkle feta evenly over sauce. Crack eggs one at a time and place over sauce, spacing evenly apart. Transfer skillet to oven and bake until whites are just set but yolks are still runny, 5–8 minutes. Garnish with parsley and cilantro. Serve with pita for dipping.
Poached Eggs in Tomato Sauce with Chickpeas and Feta

Nutritional information
Four servings, one serving contains:
Calories (kcal) 357.8
%Calories from Fat 56.4
Fat (g) 22.4
Saturated Fat (g) 7.2
Cholesterol (mg) 270.9
Carbohydrates (g) 21.6
Dietary Fiber (g) 4.5
Total Sugars (g) 7.3
Net Carbs (g) 17.1
Protein (g) 16.9
Sodium (mg) 661.0

Sunday, November 13, 2011

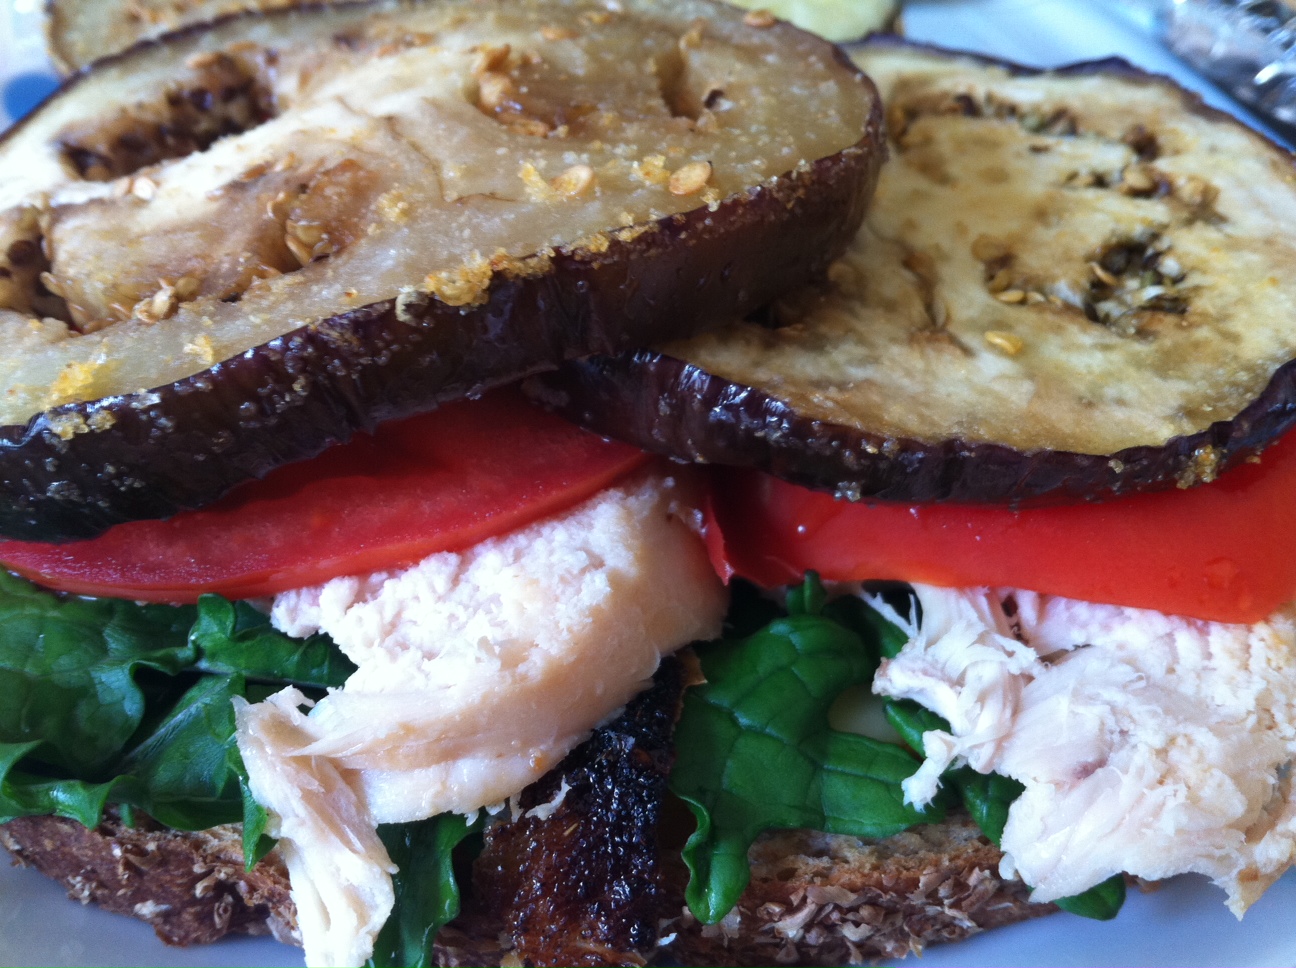
Open Face Eggplant Sandwich

It's Sunday.   Time to clean out the fridge and restock for the new week.  Opened the door and found that I could make this recipe immediately.  Yippee!


Ingredients:
1 lb tomatoes, finely chopped (2 1/2 cups)
1/4 cup finely chopped fresh flat-leaf parsley
1/2 cup plus 2 tablespoons extra-virgin olive oil
1 tablespoon white-wine vinegar
1/2 teaspoon black pepper
3/4 teaspoons salt
1 (8-oz) piece smoked cheese such as Gouda, mozzarella, or scamorza
4 (3/4-inch-thick) slices country-style bread (from an 8-inch round loaf)
2 (1-lb) eggplants

Preparation
Prepare grill for cooking over direct heat with medium-hot charcoal (moderate heat for gas); see Grilling Procedure.
While grill is heating, stir together tomatoes, parsley, 2 tablespoons oil, vinegar, pepper, and 3/4 teaspoon salt in a medium bowl.

With a cheese plane or vegetable peeler, shave half of cheese into thin slices (if using mozzarella, thinly slice half of it with a knife) and cover slices with plastic wrap, reserving remaining piece for another use.

Brush bread on both sides with 1 tablespoon oil per slice.

Trim off top and bottom of each eggplant, then cut 2 (1-inch-thick) slices lengthwise from center of each eggplant, discarding remainder. Brush cut sides with 3 tablespoons oil (total) and sprinkle with remaining 1/2 teaspoon salt.

Lightly oil grill rack, then grill eggplant slices (covered only if using a gas grill), loosening with a metal spatula and turning occasionally to avoid overbrowning, until very tender, 8 to 10 minutes. While eggplant is grilling, grill bread, turning over once, until grill marks form, 1 to 2 minutes total, and transfer to a large platter.


Transfer eggplant to platter, then top evenly with sliced cheese and return to grill and cook, covered for charcoal or gas, without turning, until cheese begins to melt, about 1 minute. Transfer eggplant with spatula to platter.

Transfer grilled bread to 4 plates and spoon tomato mixture on top. Drizzle evenly with remaining tablespoon oil and top with eggplant. Season with pepper to taste.

Cooks' notes: · If you can't grill outdoors, bread and eggplant can be cooked in 2 batches on a lightly oiled well-seasoned large (2-burner) ridged grill pan over moderate heat. Grill eggplant, turning occasionally, 10 to 13 minutes, then top with cheese. Transfer eggplant to a large baking sheet and broil about 3 inches from preheated broiler until cheese is just melted, about 1 minute. · Tomato mixture can be made 30 minutes ahead and kept at room temperature.

Tips:
  • happened to have kale in the fridge.  It was a nice combination of bitterness to the sweetness of the eggplant and creaminess of the gouda.
  • spinach, arugula would also be nice additions to this.
  • added thin slices of chicken and tomato to this sandwich.  Would work well with other ingredients that compliment eggplant as well.
  • toasted my bread in the toaster rather than grilling.
  • roasted my eggplant in the oven. I prefer grilling but for ease, I roasted it in the oven.
Read More on Epicurious